Many novice filmmakers and videographers find lighting for video interview to be quite difficult for a variety of reasons. Every video interview will provide a set of challenges based on the setup you have, the setting you're filming in, and the subjects you'll be interviewing on camera. Let’s use these tips for video interview lighting as a manual that you may use at any time and in any scenario.
Take advantage of three point lighting for video interviews
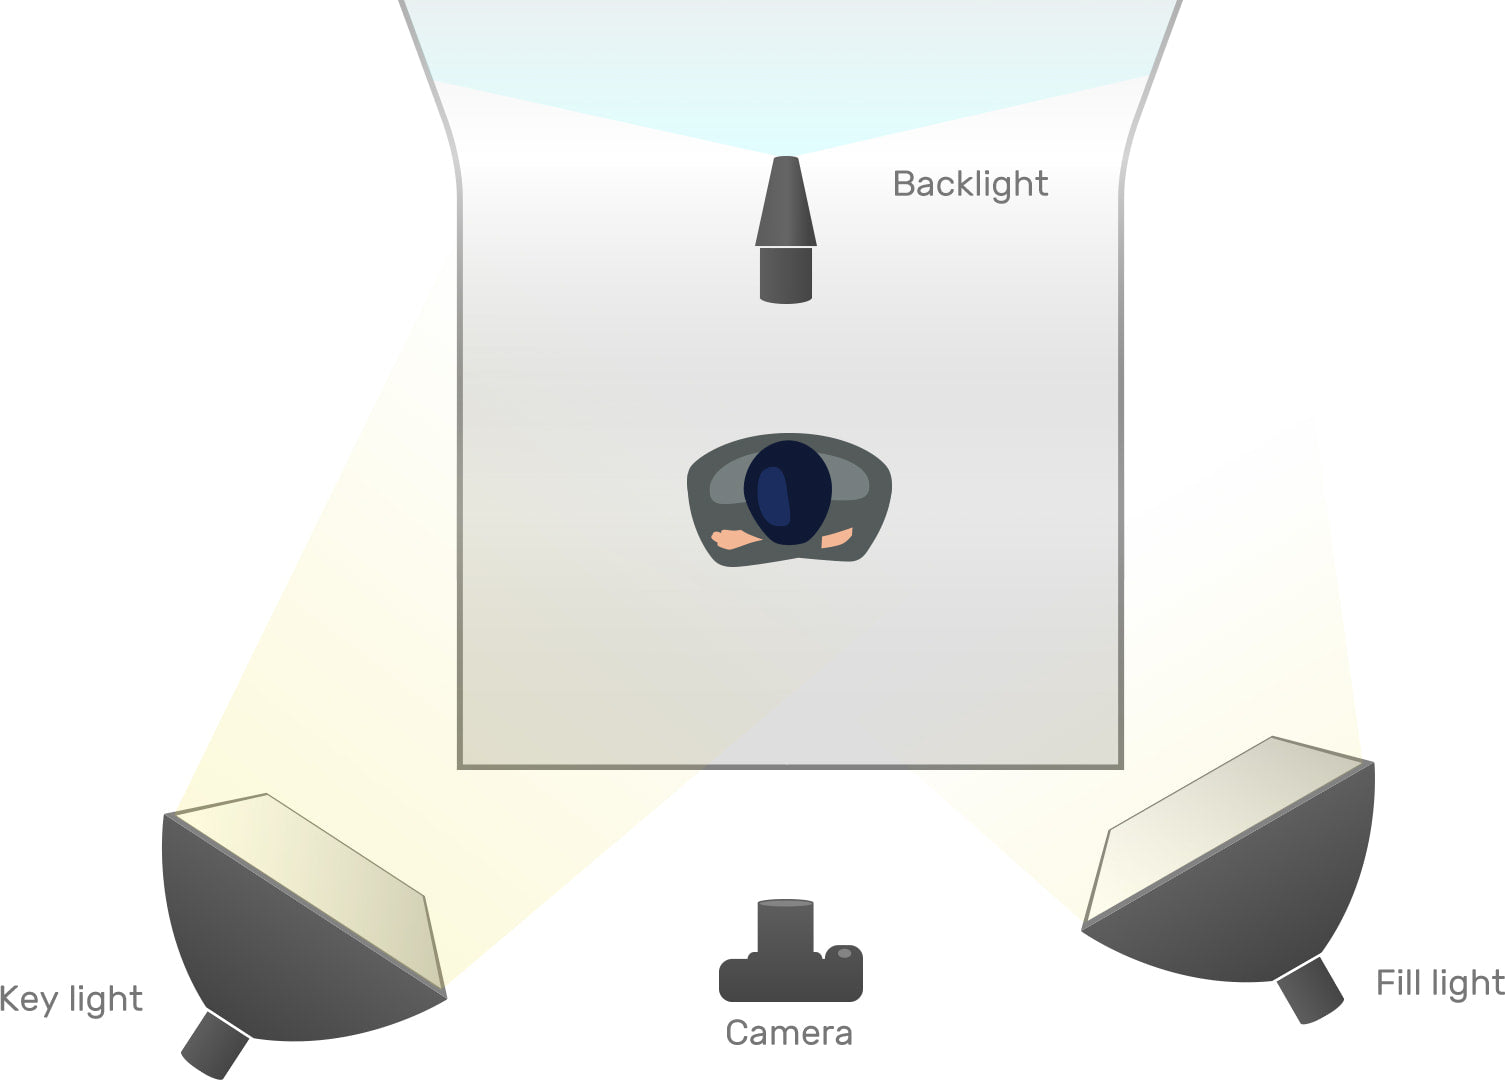
Three-point lighting indicates that you may illuminate your subject from three angles that are referred as fill, key and backlight.
The key light is the one that brightens up your subject, so it is recommended to use the brightest and largest light source you have.
The fill light makes up for the darkness and shadows frequently produced by the key one. It is less bright than your key and not always made of light. And it can also be created by reflecting light off of your key.
The backlight, which is usually positioned above and behind your subject, helps you illuminate your subject’s frame.
This is the basic setup to create a good atmosphere in your video interview. It is also a common setup of lighting for live video.
Adjust the optimum color temperature
Color temperature is a major factor to take into account when it comes to setting up indoor lighting for video interview. It ensures that you photograph your subject with the proper color. Additionally, the cold temperature allows your interview lighting to enhance the ambiance of your surroundings. To capture colors as you want, you must be aware of the color temperature of light source and the ambient light, as well as the white balance on your device.
Follow the parameters to configure your device:
When daylight or sunlight run at 3200 kelvin, the camera should be calibrated to 5600 kelvin to capture accurate color. According to this, some of the best video lights for interviews, like the COLBOR CL100XM, are suitable for daylight studio lighting.
When the warmest typical tungsten bulbs run at 5600 kelvin, the camera needs to be adjusted to 3200 kelvin.
Stick to these two color temperatures each time you configure your gadget. By doing so, you may avoid taking measurements during shooting or recording.
Color temperature differences between COLBOR video lights
|
COLBOR video light |
Light Type |
Color Temperature |
|
PL5 |
5w Small LED video light |
2700K-6500K (±100K) |
|
PL8-R |
8w Portable RGB LED light |
2700-9000K |
|
PL8B |
Bi-color portable light |
2500K-9000K |
|
PL8R |
8w RGB video light |
2500K-9000K |
|
CL100 |
100w Bi-color COB LED light |
2700-6500K |
|
CL100-M |
100w Daylight LED light |
5600K |
|
CL60 |
65w Chip on Board light |
2700K-6500K(±200) |
|
CL60M |
5600k mobile video light |
5600K (±200K) |
Configure the camera settings according to your device
Even though it can seem straightforward, this tip is crucial for the greatest outcomes. You must alter your camera’s settings in accordance with your light. You don’t want to produce an image that is either overexposed or underexposed. So, before you start taking pictures, double-check that your camera settings are correct.

Make use of lighting setup for video interview
A reflector can also be used to bounce light. You might also want to think about using close walls or low ceilings as surfaces to reflect light off of. If possible, those hues and colors can serve as reflectors.
A softbox, as a modifier, can limit the light from your device and provide a diffusion layer. It not only helps you reduce harsh shadows, but also reflects the spill light onto the subject.
[Softbox is also help in setting up lighting for car photography. Click the link to get more information if you are interested in it.]
Gels can also significantly alter the tone of the scene. They may be employed to add a little excitement to the routine and even to build contrast and tension in your image.
These are fantastic and useful tools that help you perform a video interview flawlessly.
Shoot into the shadows
You have greater editing freedom if you shoot into the shadows. You don't have to put in as much efforts to achieve your desired exposure. It works well if you have little funds and little control over your surroundings.
You'll have a lot more possibilities for lighting your subject if you choose the darkest surroundings as your background.
You can start setting up amazing photos now that you know everything there is to know about lighting for video interview. And remember, when you’re looking for fresh places to practice your shooting methods or to conduct professional productions, bag a COLBOR video light and you will get what you want easily!