Natural and consistent lighting is vital for taking food images that capture the viewer's attention. Food photography lighting equipment allows you to eliminate shadows, brighten your meals, and ensure that all of the components in your creation are visible. In this article, you can learn about the following topics.
- What lighting equipment do you need for food photography?
- Which is the best food photography lighting, soft or hard lighting?
- How to set up lighting for food photography?
What equipment is needed for food photography?
Generally, food photography lighting kit includes the following film lighting equipment.
Use continuous light for simple food photography lighting
A continuous light remains on. It provides a constant light source to your photography setup. The benefit is that you can see how the light and shadows play on your scenario. This is very helpful while shooting tethered.
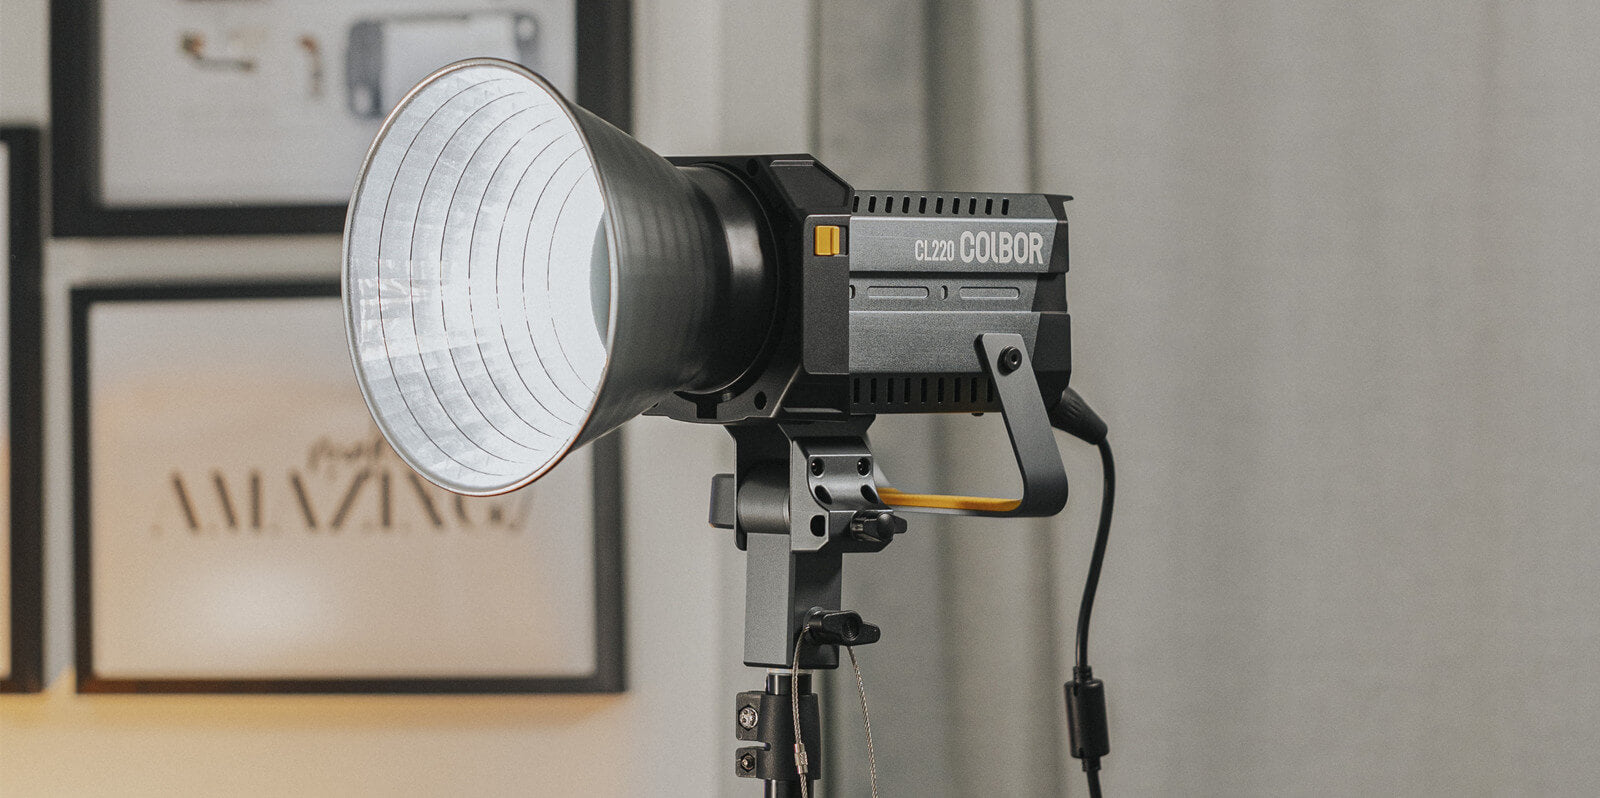
It is an excellent starting point for food or still life photography. For example, the COLBOR CL220 is a good choice of LED light for food photography. It features 2700-6500K color temperature, tungsten SSI of 85, and a CRI of 96+. This enables it to reproduce the food’s natural color. Besides, its NATO grooves and Bowen mount allow it to work with a wide range of light modifiers and photography accessories. Therefore, you can place and shape the lighting as you want to achieve the best food image.
Work with strobe for professional results
A studio strobe is food photography artificial lighting that is more powerful than most continuous types.
For a food blog or editorial-style photography, you'll need a light with at least 300 watts of power. A lot more power is required for commercial or product photography.
The majority of monolights include a modeling lamp incorporated within the strobe head. This is a continuous light source that you may switch on to provide a small constant light source. It allows you to see what you're doing while shooting.
Use modifiers to shape food photography lighting equipment
The most frequent light modifier for food photography is a softbox.
A reflector dish is a common studio flash head modifier. A honeycomb grid is a honeycomb design attachment that is put on a reflector dish. It dims and narrows the light. This offers a lovely contrast in food photographs without being too harsh.
A diffuser is another essential piece of equipment. This is a sheer white panel that you place at the edge of your table to soften the light that falls on your scene. A strobe light is a burst of light. If not dispersed, it casts harsh shadows. In food photography lighting, this is seldom the desired appearance.
Use stand to keep the light balance
A light stand is a piece of photography equipment used for shooting. The goal is to give lighting assistance so that the item can be lighted with varying degrees of intensity. The lamp source should be mounted on the top of the lamp frame to guarantee light balance, which is critical in interior photography.
Soft VS hard lighting: What lighting is best for food photography?
The answer is, it depends.
Before you begin capturing footage, you should have an idea of how you want your final photo to look. Some scenarios require soft lighting (for example, a wedding cake photo), while others require more dramatic, structured lighting to accentuate texture (for example, a still life of vegetables).
The type of light and modifiers you use will frequently be determined by your subject, and it may take some trial and error to obtain precisely the perfect light for your photo. Whatever sort of lighting you employ, Use a diffuser to generate a softened, natural line where the light and shadows converge.
Food photography equipment setup: Three commonly used types
Here are 3 common food photography lighting setups and tips to set them up.
Pull the eyes with side lighting
This is a good way to set up food photography lighting equipment. It is suitable for the majority of settings and is simple to use. It is advised that you position your lighting arrangement to your left. Our gaze is drawn to the brightest region of an image, where light enters the scene.
Working with a softbox next to your table is a common side lighting option. The softer the light, the larger the light source. This adds dimension to an image and is a popular style in food photography.
On the opposite side of the light, place a reflector or bounce card. Depending on how much shadow you want on the side of your food, move it closer or farther away. Alternatively, use a smaller or bigger reflector. It is important to note that even when photographing white and breezy images, some shadow is required to provide depth.
Use back lighting to make food photos look better
It means placing a light behind the food. It's 12:00 o'clock if you visualize the face of a clock. This is an excellent placement for drinks or soups. It provides gloss and draws attention to the liquid characteristics of food.
Backlighting is generally extremely flattering to food. However, it does not work for the following foods:
- Tall foods, such as a stack of cookies or brownies or a mound of noodles. It's challenging to bounce enough light back onto the front of burgers or stacks of pancakes.
- When photographing food in a tall or deep dish, such as a Dutch oven.
- Dark or brown items, such as meat, especially when placed on white. It produces an excessive amount of contrast.
To take backlit food photos:
- Position your food photography lighting equipment so that it is behind your meal.
- Place a diffuser between the table and lighting equipment.
- On either side of your scene, place a reflector. You'll need to experiment with their placement. The light should hit the reflecting surface and reflect back onto the front and sides of the meal.
- Feed a reflector in front of your camera, as high as feasible without interfering, so more light will be reflected onto the front of your food.
Use side backlighting for easiest setup
This combines the aforementioned lighting techniques. It is the most simple setup. Just place the light between 10:00 and 11:00.
You may get backlight surface shine with this illumination without running the danger of overexposure. Additionally, because the light is coming from a more angular angle, you don't need to reflect as much light onto the front of the food.
You should experiment with the height of your light in relation to the scene. It is up to you how you want the shadows to fall. Keep in mind that the closer your light source is close to your set, the smoother the fall-off.